气泡聊天框设计
我们期待实现如下绿色的气泡对话框
对于我们自己发出的信息,我们可以实现这样一个网格布局管理
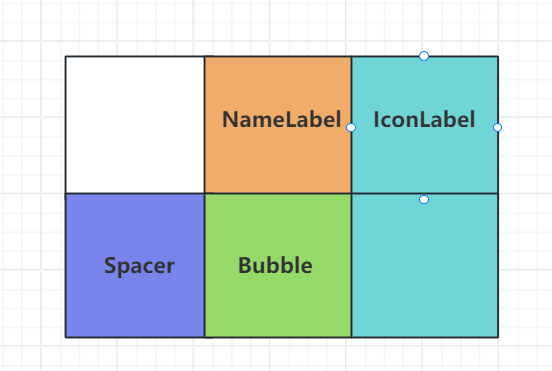
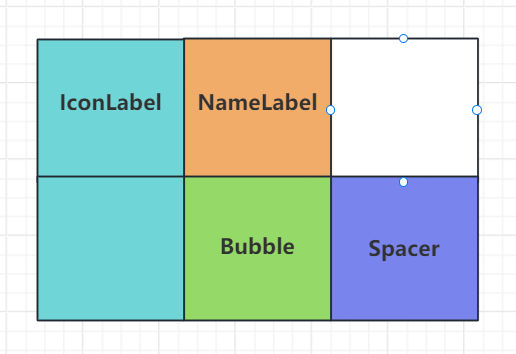
NameLabel用来显示用户的名字,Bubble用来显示聊天信息,Spacer是个弹簧,保证将NameLabel,IconLabel,Bubble等挤压到右侧。
如果是别人发出的消息,我们设置这样一个网格布局
下面是实现布局的核心代码
ChatItemBase::ChatItemBase(ChatRole role, QWidget *parent): QWidget(parent), m_role(role){m_pNameLabel = new QLabel();m_pNameLabel->setObjectName("chat_user_name");QFont font("Microsoft YaHei");font.setPointSize(9);m_pNameLabel->setFont(font);m_pNameLabel->setFixedHeight(20);m_pIconLabel = new QLabel();m_pIconLabel->setScaledContents(true);m_pIconLabel->setFixedSize(42, 42);m_pBubble = new QWidget();QGridLayout *pGLayout = new QGridLayout();pGLayout->setVerticalSpacing(3);pGLayout->setHorizontalSpacing(3);pGLayout->setMargin(3);QSpacerItem*pSpacer = new QSpacerItem(40, 20, QSizePolicy::Expanding, QSizePolicy::Minimum);if(m_role == ChatRole::Self){m_pNameLabel->setContentsMargins(0,0,8,0);m_pNameLabel->setAlignment(Qt::AlignRight);pGLayout->addWidget(m_pNameLabel, 0,1, 1,1);pGLayout->addWidget(m_pIconLabel, 0, 2, 2,1, Qt::AlignTop);pGLayout->addItem(pSpacer, 1, 0, 1, 1);pGLayout->addWidget(m_pBubble, 1,1, 1,1);pGLayout->setColumnStretch(0, 2);pGLayout->setColumnStretch(1, 3);}else{m_pNameLabel->setContentsMargins(8,0,0,0);m_pNameLabel->setAlignment(Qt::AlignLeft);pGLayout->addWidget(m_pIconLabel, 0, 0, 2,1, Qt::AlignTop);pGLayout->addWidget(m_pNameLabel, 0,1, 1,1);pGLayout->addWidget(m_pBubble, 1,1, 1,1);pGLayout->addItem(pSpacer, 2, 2, 1, 1);pGLayout->setColumnStretch(1, 3);pGLayout->setColumnStretch(2, 2);}this->setLayout(pGLayout);}
设置用户名和头像
void ChatItemBase::setUserName(const QString &name){m_pNameLabel->setText(name);}void ChatItemBase::setUserIcon(const QPixmap &icon){m_pIconLabel->setPixmap(icon);}
因为我们还要定制化实现气泡widget,所以要写个函数更新这个widget
void ChatItemBase::setWidget(QWidget *w){QGridLayout *pGLayout = (qobject_cast<QGridLayout *>)(this->layout());pGLayout->replaceWidget(m_pBubble, w);delete m_pBubble;m_pBubble = w;}
聊天气泡
我们的消息分为几种,文件,文本,图片等。所以先实现BubbleFrame作为基类
class BubbleFrame : public QFrame{Q_OBJECTpublic:BubbleFrame(ChatRole role, QWidget *parent = nullptr);void setMargin(int margin);//inline int margin(){return margin;}void setWidget(QWidget *w);protected:void paintEvent(QPaintEvent *e);private:QHBoxLayout *m_pHLayout;ChatRole m_role;int m_margin;};
BubbleFrame基类构造函数创建一个布局,要根据是自己发送的消息还是别人发送的,做margin分布
const int WIDTH_SANJIAO = 8; //三角宽BubbleFrame::BubbleFrame(ChatRole role, QWidget *parent):QFrame(parent),m_role(role),m_margin(3){m_pHLayout = new QHBoxLayout();if(m_role == ChatRole::Self)m_pHLayout->setContentsMargins(m_margin, m_margin, WIDTH_SANJIAO + m_margin, m_margin);elsem_pHLayout->setContentsMargins(WIDTH_SANJIAO + m_margin, m_margin, m_margin, m_margin);this->setLayout(m_pHLayout);}
将气泡框内设置文本内容,或者图片内容,所以实现了下面的函数
void BubbleFrame::setWidget(QWidget *w){if(m_pHLayout->count() > 0)return ;else{m_pHLayout->addWidget(w);}}
接下来绘制气泡
void BubbleFrame::paintEvent(QPaintEvent *e){QPainter painter(this);painter.setPen(Qt::NoPen);if(m_role == ChatRole::Other){//画气泡QColor bk_color(Qt::white);painter.setBrush(QBrush(bk_color));QRect bk_rect = QRect(WIDTH_SANJIAO, 0, this->width()-WIDTH_SANJIAO, this->height());painter.drawRoundedRect(bk_rect,5,5);//画小三角QPointF points[3] = {QPointF(bk_rect.x(), 12),QPointF(bk_rect.x(), 10+WIDTH_SANJIAO +2),QPointF(bk_rect.x()-WIDTH_SANJIAO, 10+WIDTH_SANJIAO-WIDTH_SANJIAO/2),};painter.drawPolygon(points, 3);}else{QColor bk_color(158,234,106);painter.setBrush(QBrush(bk_color));//画气泡QRect bk_rect = QRect(0, 0, this->width()-WIDTH_SANJIAO, this->height());painter.drawRoundedRect(bk_rect,5,5);//画三角QPointF points[3] = {QPointF(bk_rect.x()+bk_rect.width(), 12),QPointF(bk_rect.x()+bk_rect.width(), 12+WIDTH_SANJIAO +2),QPointF(bk_rect.x()+bk_rect.width()+WIDTH_SANJIAO, 10+WIDTH_SANJIAO-WIDTH_SANJIAO/2),};painter.drawPolygon(points, 3);}return QFrame::paintEvent(e);}
绘制的过程很简单,先创建QPainter,然后设置NoPen,表示不绘制轮廓线,接下来用设置指定颜色的画刷绘制图形,我们先绘制矩形再绘制三角形。
对于文本消息的绘制
TextBubble::TextBubble(ChatRole role, const QString &text, QWidget *parent):BubbleFrame(role, parent){m_pTextEdit = new QTextEdit();m_pTextEdit->setReadOnly(true);m_pTextEdit->setVerticalScrollBarPolicy(Qt::ScrollBarAlwaysOff);m_pTextEdit->setHorizontalScrollBarPolicy(Qt::ScrollBarAlwaysOff);m_pTextEdit->installEventFilter(this);QFont font("Microsoft YaHei");font.setPointSize(12);m_pTextEdit->setFont(font);setPlainText(text);setWidget(m_pTextEdit);initStyleSheet();}
setPlainText设置文本最大宽度
void TextBubble::setPlainText(const QString &text){m_pTextEdit->setPlainText(text);//m_pTextEdit->setHtml(text);//找到段落中最大宽度qreal doc_margin = m_pTextEdit->document()->documentMargin();int margin_left = this->layout()->contentsMargins().left();int margin_right = this->layout()->contentsMargins().right();QFontMetricsF fm(m_pTextEdit->font());QTextDocument *doc = m_pTextEdit->document();int max_width = 0;//遍历每一段找到 最宽的那一段for (QTextBlock it = doc->begin(); it != doc->end(); it = it.next()) //字体总长{int txtW = int(fm.width(it.text()));max_width = max_width < txtW ? txtW : max_width; //找到最长的那段}//设置这个气泡的最大宽度 只需要设置一次setMaximumWidth(max_width + doc_margin * 2 + (margin_left + margin_right)); //设置最大宽度}
我们拉伸的时候要调整气泡的高度,这里重写事件过滤器
bool TextBubble::eventFilter(QObject *o, QEvent *e){if(m_pTextEdit == o && e->type() == QEvent::Paint){adjustTextHeight(); //PaintEvent中设置}return BubbleFrame::eventFilter(o, e);}
调整高度
void TextBubble::adjustTextHeight(){qreal doc_margin = m_pTextEdit->document()->documentMargin(); //字体到边框的距离默认为4QTextDocument *doc = m_pTextEdit->document();qreal text_height = 0;//把每一段的高度相加=文本高for (QTextBlock it = doc->begin(); it != doc->end(); it = it.next()){QTextLayout *pLayout = it.layout();QRectF text_rect = pLayout->boundingRect(); //这段的recttext_height += text_rect.height();}int vMargin = this->layout()->contentsMargins().top();//设置这个气泡需要的高度 文本高+文本边距+TextEdit边框到气泡边框的距离setFixedHeight(text_height + doc_margin *2 + vMargin*2 );}
设置样式表
void TextBubble::initStyleSheet(){m_pTextEdit->setStyleSheet("QTextEdit{background:transparent;border:none}");}
对于图像的旗袍对话框类似,只是计算图像的宽高即可
#define PIC_MAX_WIDTH 160#define PIC_MAX_HEIGHT 90PictureBubble::PictureBubble(const QPixmap &picture, ChatRole role, QWidget *parent):BubbleFrame(role, parent){QLabel *lb = new QLabel();lb->setScaledContents(true);QPixmap pix = picture.scaled(QSize(PIC_MAX_WIDTH, PIC_MAX_HEIGHT), Qt::KeepAspectRatio);lb->setPixmap(pix);this->setWidget(lb);int left_margin = this->layout()->contentsMargins().left();int right_margin = this->layout()->contentsMargins().right();int v_margin = this->layout()->contentsMargins().bottom();setFixedSize(pix.width()+left_margin + right_margin, pix.height() + v_margin *2);}
发送测试
接下来在发送处实现文本和图片消息的展示,点击发送按钮根据不同的类型创建不同的气泡消息
void ChatPage::on_send_btn_clicked(){auto pTextEdit = ui->chatEdit;ChatRole role = ChatRole::Self;QString userName = QStringLiteral("恋恋风辰");QString userIcon = ":/res/head_1.jpg";const QVector<MsgInfo>& msgList = pTextEdit->getMsgList();for(int i=0; i<msgList.size(); ++i){QString type = msgList[i].msgFlag;ChatItemBase *pChatItem = new ChatItemBase(role);pChatItem->setUserName(userName);pChatItem->setUserIcon(QPixmap(userIcon));QWidget *pBubble = nullptr;if(type == "text"){pBubble = new TextBubble(role, msgList[i].content);}else if(type == "image"){pBubble = new PictureBubble(QPixmap(msgList[i].content) , role);}else if(type == "file"){}if(pBubble != nullptr){pChatItem->setWidget(pBubble);ui->chat_data_list->appendChatItem(pChatItem);}}}
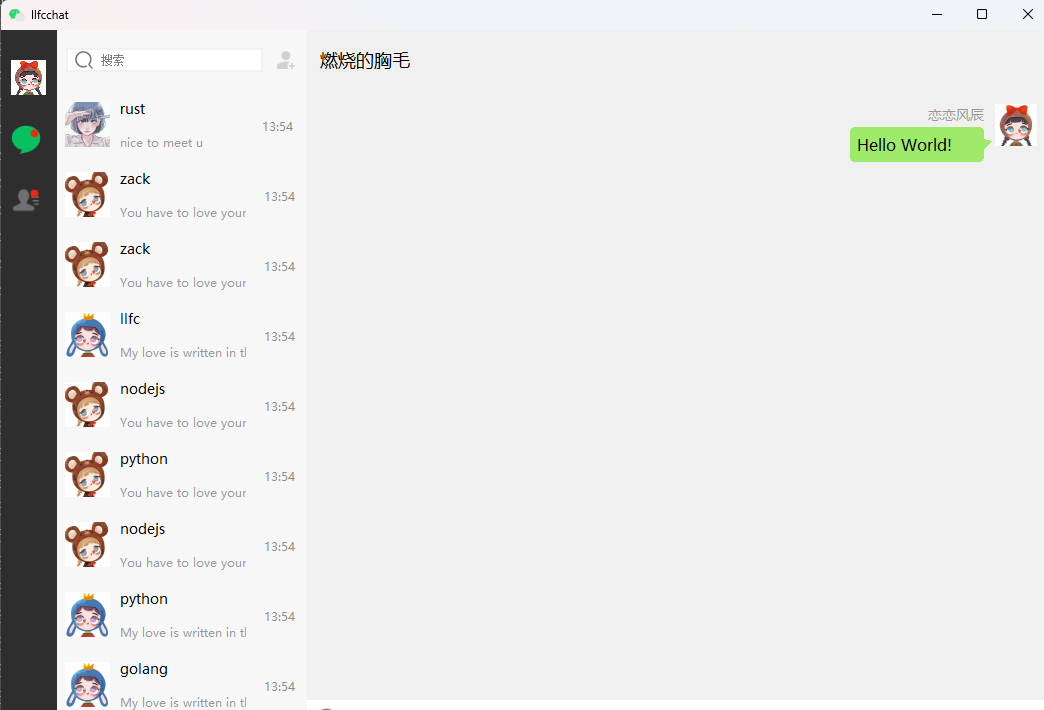
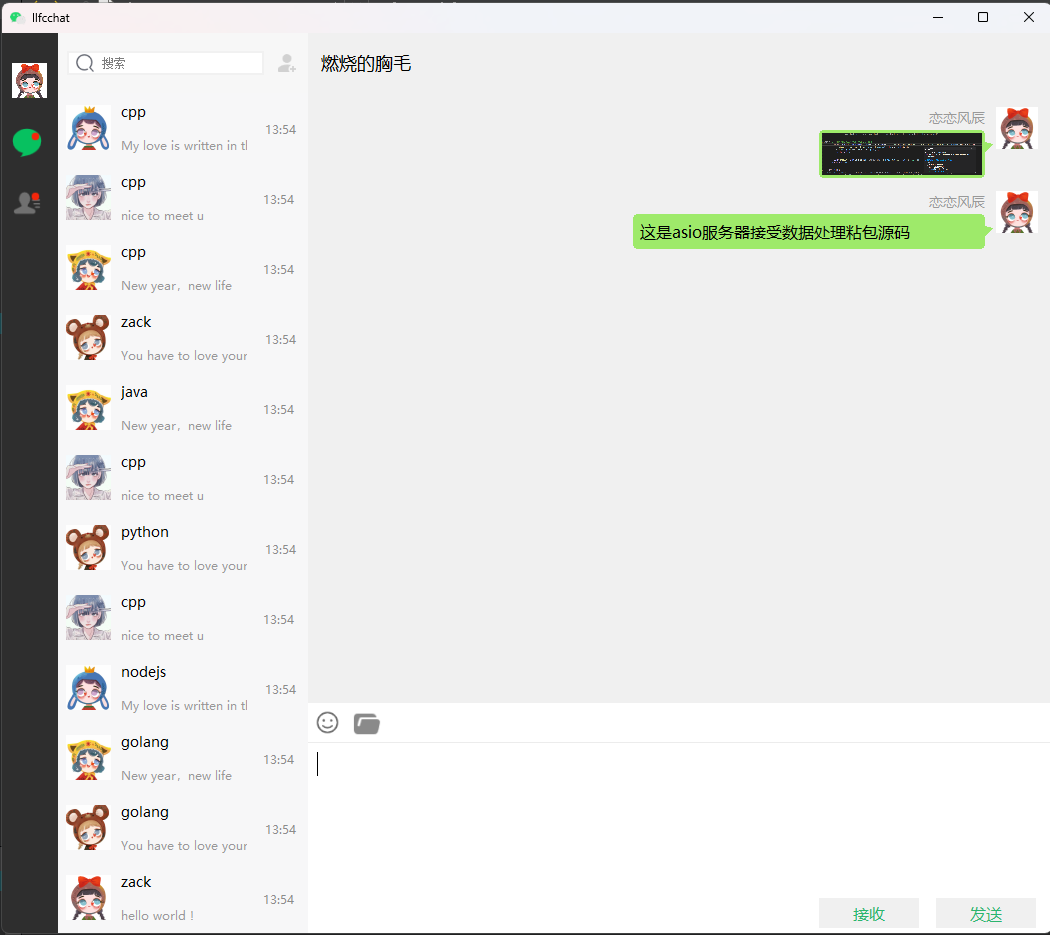
效果展示
源码和视频
https://www.bilibili.com/video/BV1Mz4218783/?vd_source=8be9e83424c2ed2c9b2a3ed1d01385e9